Laser Cutting Machines, Laser Engraving Machines
Laser Cut Wall Art with Thunder Bolt
Oct
Unlocking Creativity with the Thunder Bolt Laser Machine
Welcome to another engaging vlog from MaxLaser! Today, I’m excited to showcase how you can transform a simple image from the internet into a sophisticated piece of wall art using our state-of-the-art Thunder Bolt laser machine. This tutorial will cover everything from image selection to the final assembly, offering valuable tips and insights along the way.
Selecting and Preparing the Image
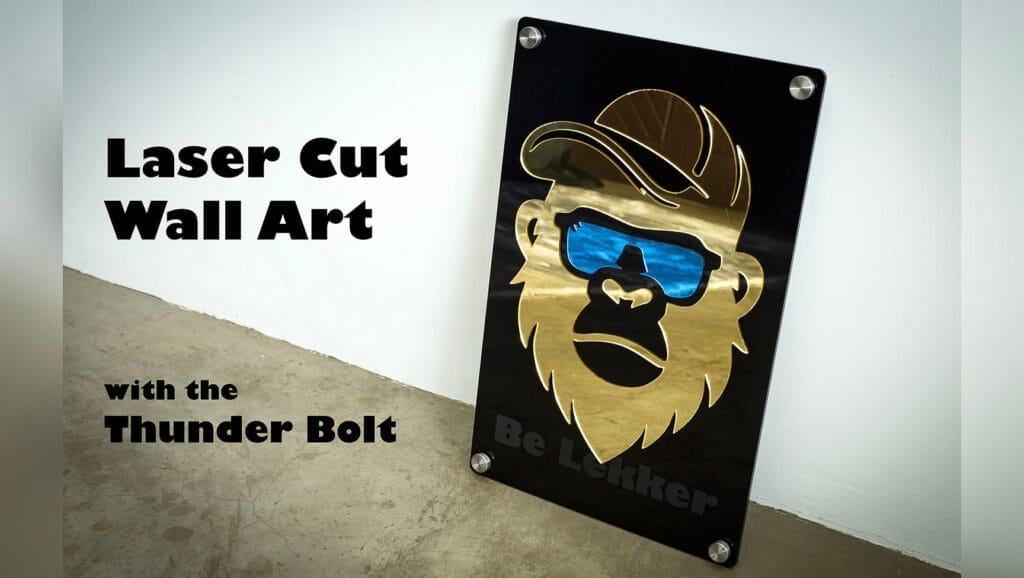
Our project starts with the selection of an image—a pixelated black and white logo of a gorilla I found on Google. The first challenge in laser cutting is converting this raster image into a vector file. Unlike raster images that pixelate when scaled, vector files maintain crisp edges regardless of size adjustments, making them perfect for detailed laser work.
Tracing and Refining in CorelDraw
With the image selected, the next step involves moving it into CorelDraw, a powerful graphics software that’s essential for preparing laser cutting files. Here’s how I handle the tracing:
- Outline Trace: CorelDraw’s outline trace tool is invaluable. I adjust the settings to enhance the image, such as increasing the rounded corners to smooth out jagged edges.
- Cleanup: After tracing, it’s crucial to clean up the image. I ungroup the traced elements to remove unwanted sections manually. This might include deleting any stray marks or irrelevant background elements that could affect the final cut.
- Combining and Welding: The remaining parts are then combined and welded into a single cohesive vector. This ensures that the laser will treat it as one unit, which is crucial for both aesthetics and structural integrity.
Enhancing the Design
Refining the design is perhaps where the magic happens. Using CorelDraw’s shaping tool, I smooth out curves and eliminate unnecessary nodes—those little points that define the path of a vector line. By double-clicking and reducing these nodes, I enhance the design’s flow and ensure it’s as clean as possible.
Finalizing the Design File
Once the design meets my standards, I save it as an AI file—a format preferred for its compatibility with various design software. The file is then exported and ready for the laser cutting phase, which I conduct using LightBurn software. This software allows precise control over the cutting and engraving processes, ensuring top-notch results.

Laser Cutting Process
The actual cutting process is where you see your design come to life:
- Mirror Acrylic Cutting: For the top layer, I use 2mm mirror acrylic. To achieve a flawless edge, I raise the acrylic slightly off the honeycomb bed to minimize reflections and potential chipping from the laser. The settings are finely tuned to 8mm/s speed and 65% power with air assist.
- Black Acrylic Cutting: The settings for the 5mm black acrylic are critical. I set the laser to cut at a slow 5mm/s speed with 65% power and air assist on. This ensures that the acrylic is cleanly cut through without melting or warping, which is crucial for the final assembly. I also raised the black acrylic off the honeycomb to get a smoother cut.
Black Acrylic Engraving
The base layer of our wall art piece involves detailed work on 5mm black extruded acrylic. This material is chosen for its depth and contrast, which highlights the intricate details of our design. Engraving requires precise control over the laser settings to achieve the best visual effect, particularly when aiming for a frosted finish.
Achieving the Frosted Finish
To create a visually appealing frosted effect, the focus of the laser is critical. Unlike other materials where a general focus setting suffices, black acrylic demands specific adjustments to enhance its aesthetic appeal:
Manual Focus Adjustment: The Thunder Bolt’s auto-focus feature sets the laser bed to 2.3mm on the z-axis, which is suitable for standard engraving tasks. However, for a frosted finish on black acrylic, a closer focus point is necessary to intensify the laser’s impact on the material. By manually adjusting the z-axis to 1.6mm, the laser head is brought closer to the acrylic surface, concentrating the laser’s energy for a more pronounced frosted effect.
Optimizing Laser Settings: Initial tests revealed issues with banding—a common problem where the laser creates uneven lines across the engraved surface. To mitigate this, I adjusted the DPI (Dots Per Inch) settings from the standard 500 to a lower 200. This reduction spreads the laser’s points more broadly, smoothing out the finish and reducing banding. Furthermore, I increased the laser power from 16% to 18% to ensure deeper penetration into the acrylic without overburning, which is crucial for maintaining the quality of the frosted look.
Final Engraving Settings: The engraving speed was set to 1000mm/s. This faster speed, combined with a power setting of 18% and the air assist turned off, ensures that the acrylic is not overheated, which can lead to melting or warping. The precise adjustment of these settings is what allows us to achieve a clean, consistent frosted finish across the entire surface of the acrylic.

Assembling the Layers
Alignment and assembly are pivotal. I first score the bottom layer lightly—just enough to mark it without cutting through. This scoring acts as a guide to perfectly align the top mirror acrylic layer. Initially, I used acrylic glue, but it produced unwanted bubbling. Switching to high-tack double-sided tape provided a much cleaner and smoother finish without any visible defects.
The Potential of Laser Cutting
This project is just a glimpse into the potential of laser cutting. With colored and mirror acrylic, you can create an array of products such as personalized gifts, home decor, custom signage, and even art installations. The versatility of materials and the precision of machines like the Thunder Bolt allow entrepreneurs and hobbyists alike to explore new avenues of creativity and business.
Why MaxLaser?
At MaxLaser, we pride ourselves on providing more than just machines. We offer a complete solution that includes training, support, and access to high-quality materials. Our Thunder Bolt laser machine exemplifies our commitment to quality, backed by a stellar 4.9 Google review rating. We deliver nationwide and are dedicated to ensuring our customers can leverage their creativity into profitable business opportunities.
Conclusion
Creating wall art with the Thunder Bolt laser machine is an excellent example of how versatile and powerful laser cutting technology can be. Whether you’re a seasoned professional or a budding entrepreneur, our tools and guidance are designed to help you succeed. Stay tuned for more tutorials, tips, and tech insights from MaxLaser, and let us help you turn your creative visions into reality.
Remember to like, share, and subscribe for more creative ideas and detailed tutorials on how to make the most of your laser cutting and engraving machine!